Original Link: https://www.anandtech.com/show/2405
A Lesson in User Failure: Investigating the Serial ATA Connector
by Ryan Smith on January 18, 2008 12:00 AM EST- Posted in
- Storage
A Lesson in User Failure: Investigating the Serial ATA Connector
Something you learn quickly in this industry is that working as a technology journalist does not make you immune to computer problems or the laws of physics that can be at the root of them. Just by doing our work we tend to break things now and then; overclocked processors become keychains, overheated video cards become surgical knives (make no mistake, PCB is a very capable blade), and gadgets become interesting conversational pieces. Much of this we'll make a passing observation on, but otherwise we don't talk about failures too often.
Every once in a while though, we will break something in a process that's genuinely interesting. Failure is its own reward, it teaches us how to not do something or do something better than we did before. And in those handful of cases, we like to get to the bottom of what went wrong, what we did wrong, and what can be done to avoid the issue in the future. In these cases, you the reader can receive some of our imparted knowledge without needing to also experience the pain and cost of the lesson.
So what have we managed to break this time that we find so interesting that it's worth writing about? We made what is in fact a very common mistake, and nearly turned a week-old hard drive in to a new source of magnets by breaking the Serial ATA connector on the drive. It's the kind of problem that sounds rather trivial, but due to the construction of many SATA hard drives, breaking the SATA connector is a death sentence for the drive because it's impractical-to-impossible to replace it, as it's part of the circuit board if not also part of the drive itself.
It's only appropriate to preface this by saying that we're not dissatisfied with the SATA specification, rather we find ourselves in an interesting situation. The thinner cable is far easier to route in a cramped case than a Parallel ATA cable, it doesn't impede airflow like a ribbon cable, and getting rid of hooking two devices to a single cable was a long-overdue change.
But - and we know we're not alone in this thought - SATA cables and connectors aren't quite as robust as the old PATA design. PATA cables could be worked in to rather impossible situations as the connector was extremely snug fitting, and the cable itself was extremely flexible when it needed to be folded longitudinally; it was hard to set up but also hard to break. We'll still take a SATA setup any day of the week, but we've come to the realization we can't abuse SATA setups like we could PATA setups.
As a consequence, today we'll share with you what we found out in dealing with our problem. What did we do wrong? What can we do about it? And just why is the SATA connector designed the way it is anyhow? Read on to find out.
SATA Anatomy, Failure Anatomy
It’s best to start first with a quick history lesson on the SATA design, as it hasn’t been static through the years. It has gone through some important revisions - some visible and some not – that have shaped the SATA connector in to what we see today. We’d also like to thank Knut Grimsrud, chairman of the SATA International Organization and Intel Fellow in their Technology & Manufacturing group for helping us out with this article and answering some of our questions.
First and foremost, the SATA-IO identified issues early on with the design of the SATA connector, and has revised it several times. This is most obvious in the move from the SATA 1 motherboard connector to the SATA 2 motherboard connector, where the SATA 1 motherboard connector was far more exposed than the SATA 2 connector. This switchover was particularly evident on boards using both native and external SATA controllers, where one would be SATA 2 compliant and the other SATA 1, requiring the different connectors.
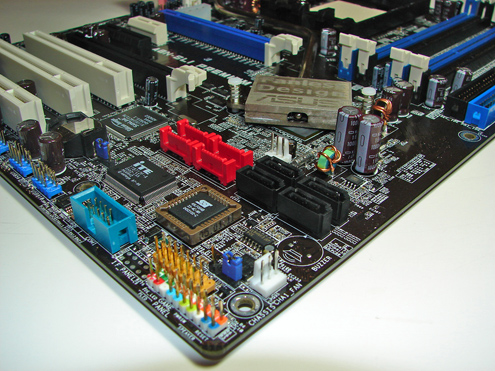
The SATA 2 motherboard connector added shrouding around the connector, which significantly improved the durability of the connector as the shrouding prevented cables from easily bending the wafer part of the connector. Unfortunately this kind of shrouding couldn’t be added to SATA devices, because the standard was designed for use in small devices that don’t have clearance to fit a full shroud. This results in the modern half-shroud design for devices, where the top-half of the connector is shrouded by the device but not the bottom half.
The other significant changes in the standard since its inception have been latching and chamfering. Most SATA devices now have recesses in their top side shroud that allow barbs on SATA cables to latch in to in order to provide downward stability since the underside is the unshrouded side. Chamfering has been added to the square edges of the tongue, and while not a visibly dramatic change, we’ve been told this is one of the primary improvements in strengthening the SATA connector.
Yet in spite of these changes we’ve still managed to do something wrong and break the connector on our hard drive. For the reason why, we’ll start with case designs and cable designs.
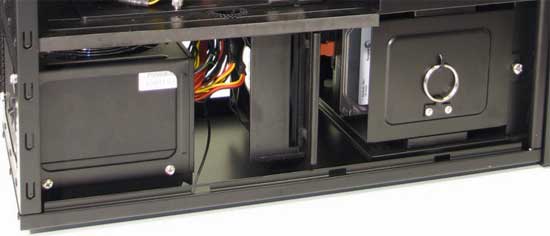
Part of our problem can be attributed to the amount of space we have to work in with the case involved in this investigation, the Antec P182. The P182, like many other cases, doesn’t leave a lot of space behind the primary hard drive bay. For most cases this is because there are motherboard components and cards in the way, while with the P182 it’s a matter of a 120mm fan being located behind the hard drive bay, which helps pull air through the lower chamber. Either way, with this specific case, we measure that we have about 2” between the rear end of a hard drive and the fan, which is very little space to work in.
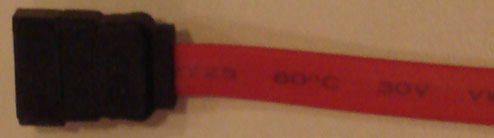
We then come to the cable, in this case it was a bog-standard cable that came with one of the products we’ve used over the years. As we mentioned earlier, SATA cables aren’t quite as flexible as PATA cables when it comes to longitudinal bending, and while we can technically bend a cable completely over at any location, this isn’t great because it causes the cable to pull back in to a more relaxed position. From the tip of the connector, the cable we measured needs about 2.5” of space to bend comfortably.
With the amount of clearance we have being less than the amount of space to need to ideally bend the cable, it becomes obvious that this will quickly become tricky. We need to bend the cable at a sharper angle so that it stays well clear of the fan, which means it’s going to be exerting some force on our hard drive, a generally acceptable but not ideal situation.
And then finally there is the layout of the P182’s hard drive bay. The P182 requires the hard drives to be installed in to the cage at an angle, such that they are on their sides with the bottom pointing towards the bottom of the case, which you can see here. Keep in mind the fact that the top hard drive is on the opposite side of the case from where the motherboard is.
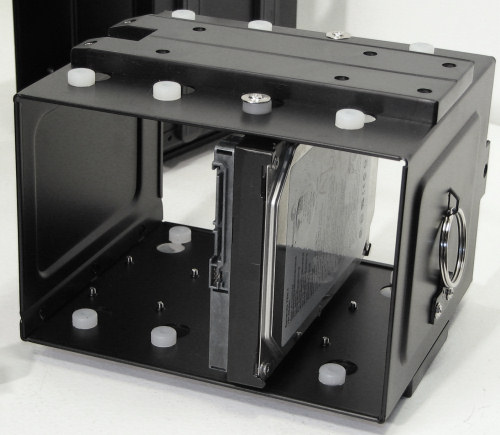
In this combination, we have the anatomy of our failure. Our cable is putting force on the SATA data connector towards the bottom side, which as we covered earlier is the weaker direction to go because it’s not shrouded like the top side is. Furthermore we’re using a SATA-1 style cable without a latch, which means we don’t have said latch to reinforce the connection. It turns out that this is enough force to break the SATA data connector on our hard drive, and when the drive cage was being secured one day the connector broke.

Resolution, Prevention, and Closing Thoughts
In our case we were fortunate. The data pins on the SATA connector were fine, we simply didn’t have wafer to hold a cable on top of the pins. We ultimately managed to find the piece of the plastic wafer that broke off, and with a bit of tape MacGuyvered a solution with another, particularly tight SATA cable that allowed us to get the drive back in to working order. But this is luck on our part, just finding the wafer, let alone is breaking in a manner that allowed us to enact this fix is not common for other computer owners we’ve talked to with this problem.
But as we mentioned in the opening of this article, what happened to us was completely preventable. We’ll freely admit that what happened was due to negligence, and could have been avoided with a little more careful consideration. How?
By far, the easiest solution would have been to use the right cable. A latching cable would have prevented some of the downward deflection that caused the connector to break. A better solution however is to have used an angled SATA cable, in which one connector is at a 90 degree angle. Using a right-angled cable would have made our SATA flow along the width of the case rather than the depth of it, allowing us to avoid routing a cable towards the fan, and avoiding the need to bend it so sharply that it exerted any significant force on the drive’s data connector.
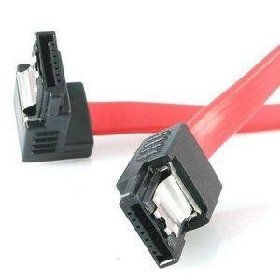
Image courtesy of Amazon.com
Unfortunately angled connectors are not a common part. Because they’re not practical to use in every situation (mainly those where the cable needs to be going the other way) we do not see drive manufacturers or motherboard manufacturers include angled cables with their products, instead they ship with traditional straight cables that are acceptable in most situations. This situation requires a builder to have the foresight to purchase an angled cable separately (a quick search on Newegg found one such cable for $2) which was what we were initially lacking.
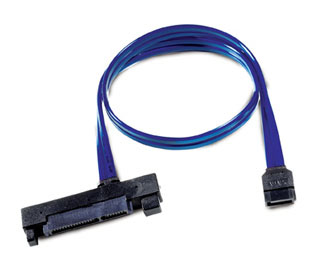
Another option for our case would have been to go with one of a small number of reinforced SATA cable devices. The most notable of these would be the now-discontinued SecureConnect cable, which is functionally a cable with a far larger connector on the drive end that secures itself against the drive. Unfortunately Western Digital went with a proprietary route here in order that the enlarged connector would have something better to hook on to by putting extra pits on their hard drives, which means the cable can’t be used on non-WD hard drives like ours. There are a few smaller parts manufacturers that make similar devices that will work with any drive, but these wouldn’t be quite as secure; we do not have any on hand to test but we believe any such device would have still prevented the drive’s connector from breaking (and yes, we’re aware of the irony of such a device further closing the already small space between the drive and the fan).
Closing Thoughts
No matter how we decided to go about reinforcing our setup however, the point stands that in hindsight we should have done something as we had a situation that was likely to (and did) result in a connector breaking. We were fortunate that it broke in a manner that wasn’t a fatal problem (and that we found the bit of plastic wafer that broke off), but this can be a fatal error.
The moral of the story, and the reason we even bothered to publish this article is to share with you the reader an analysis of what happened, to pass on what we learned so that it doesn’t happen to you. The vast majority of computer builders will never even find themselves in a situation where they can break a connector, and even then only a fraction of those builders will actually break something, but it does happen. And out of any hardware that can be broken, most of us would rather lose anything else before a hard drive, due to the desire not to lose the data stored on it.
Our lesson then is this: don’t hesitate to use additional hardware to hook up a SATA drive if you’re in tight spaces. An angled cable is only a couple of dollars (and will likely outlast any other system component) can prevent turning a hard drive worth a hundred times that value from turning in to an oversized paperweight. The SATA connector is by no means fragile, but it’s not abuse-resistant, it requires a little more care than most of us are accustomed to when it comes to hooking up hard drives.
As is often the case, the effort to prevent the breakage would have been easier than the resolution.


