Original Link: https://www.anandtech.com/show/461
i820 Motherboard Roundup - January 2000
by Anand Lal Shimpi on January 28, 2000 2:44 AM EST- Posted in
- Motherboards
After a very embarrassing delay in November of last year, the i820 chipset finally saw the light of day towards the end of 1999. Even after its release and on into the start of the new year, finding motherboards based on the chipset was a very difficult task. While at last year’s Fall Comdex, a number of manufacturers showcased their i820 based solutions, but very few of those motherboards are actually available to the public.
The reasons behind this i820 disappearing act are mainly a result from a simple lack of demand for motherboards based on the chipset. As you are most likely aware of, the major downfall of the i820 chipset was in its exclusive support for Direct Rambus DRAM (DRDRAM, commonly known as RDRAM) as a memory standard. Not only did the i820’s RDRAM implementation offer very little of a performance improvement over the current PC100 standard supported on BX motherboards but the incredible cost of RDRAM is keeping the modules from quietly making their way into the market.
The yields on RDRAM have also been troubling the standard as memory manufacturers are having difficulty producing RDRAM in high enough quantities at the top 400MHz speeds (356MHz and 266MHz parts are somewhat easier to produce because of yield issues). In essence, we have a chipset that supports a memory standard whose current implementation offers very little (if any) performance improvement over SDRAM, boasts a significantly higher cost for the end user, and features noticeably low yields on the memory chips themselves, driving the cost of manufacturing up even more.
Needless to say that the i820 platform isn’t something that most manufacturers and OEMs have been jumping up and down to adopt. However, the fact of the matter is that there is a demand for i820 based motherboards out there, and the interest in these motherboards is growing as time goes on. Therefore in our first motherboard roundup of the new year, we will be taking a look at 7 of the top i820 based motherboard solutions that are either currently available or will shortly assume that status.
The motherboards we will be taking a look at are the AOpen AX6C, AOpen AX6C-L, ASUS P3C-2000, Gigabyte GA-6CX, Iwill DS133R, Supermicro PIII-SCA, and the Transcend TS-ACA1.
The Chipset
Before diving into the motherboards we’ll want to take a quick glance at the i820 chipset itself. For more in-depth coverage of the i820 chipset feel free to take a look at our i820 Chipset Review.
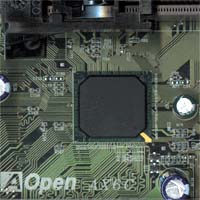
The i820 chipset is the second chipset from Intel (if you count the i810 and i810E as being one chipset release) to make use of the Accelerated Hub Architecture (AHA). Intel’s AHA is the replacement for the age old system of splitting the core logic into bridges, most recently, into a North Bridge and a South Bridge.
The i820’s AHA is split into three major parts, called hubs: the Memory Controller Hub (MCH), the I/O Controller Hub (ICH) and the Firmware Hub (FWH), which is merely a fancy name for the BIOS.
 The
MCH, as the name implies, provides the common interface between the processor,
AGP bus, and the memory bus. There are two versions of the MCH: the 82820 and
the 82820DP The latter is for use with dual processor motherboards, but since
they are both 324-pin, the solutions are interchangeable.
The
MCH, as the name implies, provides the common interface between the processor,
AGP bus, and the memory bus. There are two versions of the MCH: the 82820 and
the 82820DP The latter is for use with dual processor motherboards, but since
they are both 324-pin, the solutions are interchangeable.
From a memory standpoint, it acts as sort of a translator between the CPU and the memory bus. Although the 820’s MCH officially supports RDRAM, it’s implementation of RDRAM is a 16-bit wide implementation of the memory bus. And as we already know, the P6 bus provides a 64-bit data pathway to and from the CPU. So what happens when you want to send 64-bits of data from to a 16-bit wide memory bus?
This is where the MCH steps in and makes sure that the 64-bit wide CPU bus is effectively translated and piped down into the 16-bit wide memory bus. If you’ve ever heard anyone complaining about RDRAM’s increased latency versus SDRAM, you’re looking at one major cause for those complaints, the process of sending 64-bits of data down into a 16-bit data path. The MCH itself provides for this translation and, in doing so, obviously helps to produce the increased latency that we often complain about being associated with RDRAM.
This is why it is correct to state that the latency issues associated with RDRAM are actually best associated with the RDRAM implementation on the i820 chipset. There is always the possibility of having a wider memory bus with an RDRAM implementation thus helping to decrease the latencies associated with the 16-bit implementation on the i820 chipset.
The MCH also provides for the AGP 4X support of the i820 chipset. While the AGP 4X support doesn’t offer an incredible performance increase over the AGP 2X support that is present in the BX chipset, the biggest advantage the i820 chipset offers over previous Intel chipsets is its support for the ½ AGP clock divider.
By allowing for the AGP bus to operate at ½ the frequency of the system bus, the i820 chipset allows for official support for the 133MHz FSB and increases the overclocking potential of most systems since FSB frequencies above 133MHz can be picked without worrying too much about your AGP card not being able to handle the increased bus speed.
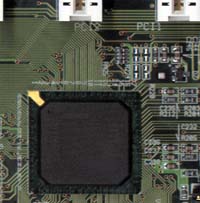 The
801AA I/O Controller Hub (ICH) found on the i810 and i810E chipsets is also
a part of the i820 chipset. The 801AA is what drives the PCI bus on i820 motherboards,
and it supports up to 6 PCI slots. Notice that there is no mention of support
for ISA slots with the 801AA, the reason behind that is because the ICH does
not support any ISA slots. If motherboard manufacturers wish to include ISA
slots in their motherboard design then they will have to make use of an optional
ISA bridge that will take up valuable PCB space on the motherboard as well as
slightly increase the cost of the board.
The
801AA I/O Controller Hub (ICH) found on the i810 and i810E chipsets is also
a part of the i820 chipset. The 801AA is what drives the PCI bus on i820 motherboards,
and it supports up to 6 PCI slots. Notice that there is no mention of support
for ISA slots with the 801AA, the reason behind that is because the ICH does
not support any ISA slots. If motherboard manufacturers wish to include ISA
slots in their motherboard design then they will have to make use of an optional
ISA bridge that will take up valuable PCB space on the motherboard as well as
slightly increase the cost of the board.
From a peripheral standpoint, the 801AA is what allows i820 motherboards to boast native support for Ultra ATA 66 (4 devices allowed) as well as USB support (2 ports) and support for AMR (Audio Modem Riser) cards.
What to look for in an i820 Motherboard
In the past few years, motherboards have increased in quality, reliability, and performance, but the main things you look for in a motherboard hasn’t really changed. You look for stability, expansion and features. Cost is often a concern, but for the most part, motherboards in the same category (such as those based on the i820 chipset) generally go for approximately the same cost.
Form Factor & SizeThe old AT form factor gave us its last breath of air with the BX chipset as less than a handful of BX motherboards were ever made in an AT form factor layout. The superior ATX form factor has now completely taken over and there are a number of different variations on the ATX form factor that you will see used with i820 motherboards.
Of the form factors, you will most likely see i820 motherboards available in the standard ATX form factor, although, don’t be too surprised if they become available in microATX form factors as well.
There is a new entry into the form factor arena, the WTX standard. The WTX standard is a major extension of the ATX form factor, which was developed for the mid-range workstation market. The specification primarily differs from the standard ATX spec by its support for larger motherboards. Currently, we have only seen motherboards based on the i840 chipset taking advantage of the WTX form factor, but in the future, as more high-end i820 boards appear, we may start to see some of them using the WTX form factor. Because of the larger motherboard support, WTX motherboards can’t be used in ATX cases (just like ATX motherboards can’t be used in microATX cases), but the standard is backwards compatible so you can use ATX form factor motherboards in WTX cases (just like you can use microATX motherboards in ATX cases).
The size of the motherboard is also a very important issue to look at. For those of you with average sized mid-tower ATX cases, an overly large ATX motherboard may have a difficult time finding its home in your case. Before you consider upgrading to a new motherboard, make sure your case can accommodate your new motherboard.
Expansion Slots
In terms of expansion, most i820 motherboards will offer very similar expansion slot configurations. Very rarely will you see an i820 motherboard outfitted with any ISA slots. As we mentioned in our description of the i820 chipset, the 801AA I/O Controller Hub does not support any ISA slots, but a motherboard may be outfitted with ISA slots provided that an ISA bridge is used. However, remember that the ATX case specification only allows for 7 expansion slots to be occupied at any given time, and with most i820 motherboards shipping with no less than 5 PCI slots, taking into account 1 AGP slot and 1 AMR slot, you’ll most likely never see an i820 motherboard with more than a single ISA slot, which would be shared with its closest PCI partner.
If you’re upgrading to the i820 platform you’re probably going to want to make the move to ditch all of your old ISA peripherals. You should be able to replace them quite easily with superior PCI counterparts, the only exception being your modem. Most PCI modems aren’t hardware modems, but, rather, they are software based (often referred to as Winmodems because of their dependence on the MS Windows operating system for proper operation), meaning they have very little hardware on board and rely on your CPU to do most of the work such as processing the signals sent to the modem and compressing/decompressing data.
While you can find some hardware PCI modems (such as the 3Com Internet Gaming Modem and the 3Com/USR 56K PCI Faxmodem) they typically retail for around $100 or more, so if you have a problem migrating to a PCI soft modem and don’t feel like spending the added cash for a new hardware based PCI modem then you may want to opt for a board with a single ISA slot. Then again, broadband internet connections are flourishing in many areas so you may not even need to worry about a modem.
Regardless of the situation, don’t plan on using more than 1 of your old ISA peripherals on an i820 motherboard. It’s time to finally get rid of those ISA peripherals that you know you’ve been hanging on to for entirely too long ;)
Most i820 motherboards will be outfitted with around 5 PCI slots. With a 6 PCI slot maximum of the 801AA ICH, why is it that most manufacturers will only be using 5 PCI slots? Virtually all i820 motherboards will come equipped with an AMR slot, and, unfortunately, that AMR slot, regardless of whether you actually use it or not, occupies a slot position on the motherboard. With the standard ATX specification only allowing for 7 slot cutouts on the back of cases and 2 slot positions already being occupied on an i820 motherboard (AMR + AGP slot), that leaves a total of 5 possible slot positions open for PCI or ISA slots.
The truth of the matter is that most end users won’t even bother with the AMR slot. The AMR slot is more of an OEM option than something an end user would be overly interested in. Therefore, you can see how many users would prefer to have a 6th PCI slot instead of an AMR slot. There is a way around this, but very few manufacturers are offering it.
We first noticed it on Tyan’s 810 board (S2054) - an AMR slot that was shared with a PCI slot so that you could either occupy the AMR slot or the PCI slot with a card. This worked fine on the Tyan board because it only had 4 slots and the AMR slot was placed at the end of the board, but on a motherboard with 7 other slots, you would need an AMR card that faced the opposite direction (like an ISA card) from a PCI card in order to make use of the AMR slot. This may be wishing for too much, but it would definitely be a much better alternative to boards with 5 PCI slots and 1 AMR slot, especially to those users that really don’t want an AMR slot. As we mentioned before, the slot is mainly for OEMs.
AGP Pro
A newcomer to the expansion slot field is the AGP Pro slot. The AGP Pro specification is an extension of the AGP 4X specification that features a connector with 48 more power and ground pins, 20 of them on one end of the regular AGP 4X connector and the remaining 28 pins on the other end. The transfer rate over an AGP Pro slot is identical to that of an AGP 4X slot (1.06GB/s), and thus doesn’t operate at any higher frequency.
The purpose of the AGP Pro slot is to power the demanding AGP cards that are slowly but surely appearing in the high end market. These cards, known as AGP Pro50 or AGP Pro110 cards, require more power than the standard AGP slot can provide and thus benefit from the extra power pins provided for by the AGP Pro slot.
An AGP Pro50 card consumes 25W – 50W of power (hence the name Pro50) and an AGP Pro110 card consumes anywhere from 50W of power up to a full 110W (again, hence the name Pro110). A regular AGP card can be used in an AGP Pro slot, but because of the extra power required and the 48 new pins, an AGP Pro card cannot be used in a regular AGP slot.
According to the current revision of the AGP Pro specification (1.1A), retail AGP Pro110 cards can use up to 2 adjacent PCI slots as clearance for cooling the card. The AGP Pro50 specification calls for only 1 PCI slot to be left unoccupied for this purpose. In order to ensure that these slots remain free, a three-slot (AGP Pro110) or a two-slot wide I/O bracket can be installed.
According to the specification, this is simply an option and OEMs may choose not to use an I/O bracket to free up those slots. If the AGP Pro card is a multi-slot solution then the specification states that those additional slots can be used for mechanical support, electrical power, or PCI bus function purposes. We have yet to see a design that implements such a unique multi-slot solution, but the specification does allow for it, should the need arise.
AGP Connectors
- Taken from AGP Pro Specification 1.1A

The first AGP Pro card that we saw was the reference DDR Quadro board from NVIDIA. From our review of the DDR Quadro, you’ll know that the board was a 64MB reference board equipped with Double Data Rate SGRAM, which in itself consumes quite a bit of power, but when coupled with the 23 million transistor Quadro chip placed on the board, the card turns into quite a bit of a power hog. While we ran the DDR Quadro board through our professional level tests without any problems on a regular AGP slot, expect more and more high end cards to begin to require the added power the AGP Pro slot is capable of delivering.
In order to make the point that the demand for more power to AGP cards is a valid one, take a look at the next generation of 3dfx graphics accelerators. The Voodoo5 6000 requires an external 100W power supply in order for it to run properly. This is virtually the maximum amount of power the AGP Pro110 specification states can be delivered to a card, and it’s not even for a professional level graphics accelerator.
Out of the seven i820 motherboards we have been testing for the past few weeks, two of them are outfitted with AGP Pro slots. Depending on what your system is going to be used for, an AGP Pro slot may be something you’re interested in having. Whether or not manufacturers adopt the AGP Pro standard and use it in their card designs has yet to be seen, but the fact of the matter is that graphics cards are drawing more and more power (i.e. Voodoo5 6000) and, in order to supply the necessary power to these cards, the motherboards will either have to sport AGP Pro slots or video card manufacturers will have to move to 3dfx’s solution of providing an external power supply.
Integrated Audio/Telephony Codecs
One of the major OEM pushes towards the i810 chipset upon its introduction was its support for Audio/Telephony Codecs to be integrated onto the motherboard. That level of integration has been pushed over onto the i820 motherboard market as well. While the i820 chipset is much less of an integrated motherboard solution than the i810 was (no integrated video), to OEMs, the more you can put on a motherboard the cheaper the overall cost of the system will be and the more profit the OEMs can enjoy.
Most i820 motherboards that take advantage of the Audio Codec ’97 support of the i820 chipset will feature an AC’97 controller placed on the motherboard that drives an integrated audio output while supporting the use of the AMR (Audio Modem Riser) slot for higher quality audio or modem support. The reason for the use of the AMR slot is to place the more sensitive components on an AMR slot so that motherboard manufacturers don’t have to increase the production time of their products because of the certification required for sensitive analog components such as those on modems or higher quality audio devices. This is also why, in spite of the presence of the AMR slot, the motherboard manufacturers will go ahead and include audio inputs/outputs on the motherboard itself, so they don’t have to worry about the certification time required by an AMR card in order to ship their boards to OEMs with integrated sound.
Remember that these AC’97 controllers depend on the host CPU to do most of the work associated with their particular tasks, but because of this they add a negligible amount to the final cost of the motherboard.
Most motherboards we have seen make use of the Analog Devices 1881 Soundport Codec or the Cirrus Logic CrystalClear SoundFusion AC’97 controller; however, according to Intel, the following manufacturers produce AC’97 controllers for use with the i820 chipset in providing both soft audio and modem support:
If you would rather use your sound card (an option that most Vortex2 or SB Live! owners will want to take), then rest assured that you’ll have no problem disabling the on-board AC’97 controller either through the BIOS setup or through an on-board jumper. We have yet to encounter a motherboard that failed to allow us the option of disabling the on-board AC’97 controller.
Memory Support
We started out this roundup by mentioning that Intel’s 820 chipset was embarrassingly delayed by a show stopping bug that was discovered by Dell just days before the chipsets October 25th launch. The bug ended up being related to a layout issue with i820 motherboards that featured 3 RIMM slots and Intel pulled the plug on all i820 motherboards that featured 3 RIMM slots.
 Their
solution was to simply instruct all motherboard manufacturers with i820 motherboard
designs to limit the number of RIMM slots to a total of 2. While there is still
quite a few unanswered questions regarding the actual layout issue (many Taiwanese
motherboard manufacturers state that their designs with 3 RIMMs had no problem,
while Intel tells us otherwise), all of the i820 boards that were ready to roll
had to be called back and redesigned with 2 RIMM slots.
Their
solution was to simply instruct all motherboard manufacturers with i820 motherboard
designs to limit the number of RIMM slots to a total of 2. While there is still
quite a few unanswered questions regarding the actual layout issue (many Taiwanese
motherboard manufacturers state that their designs with 3 RIMMs had no problem,
while Intel tells us otherwise), all of the i820 boards that were ready to roll
had to be called back and redesigned with 2 RIMM slots.
As you can guess, this does limit your memory expansion quite a bit, but almost all manufacturers have moved to 2 RIMM i820 designs. The exception being a member of this roundup, AOpen, who offers both a 2 RIMM and 3 RIMM motherboard solution. According to AOpen, they failed to notice any instability issues with their 3 RIMM design and, in our tests, we failed to notice a difference in stability even when using 3 Rambus modules in the AX6C outfitted with 3 RIMM slots.
We’ve mentioned time and time again that the i820’s MCH only supports RDRAM as a memory type. This is a major disadvantage for OEMs and end users looking to use i820 motherboards in their systems primarily because of the added cost of RDRAM which isn’t being helped by recent reports of yield issues on RDRAM chips.
In an attempt to increase the acceptance of the i820 chipset, Intel provided another solution to the problem of having to use RDRAM. By using a Memory Translator Hub (MTH) PC100 SDRAM support can be added to the i820 chipset.
The function of the MTH is to take the 16-bit RDRAM memory requests from the MCH and “translate” them into 64-bit SDRAM memory requests. The same translation occurs upstream as well as downstream, and, as you can probably guess, this does result in a considerable performance hit. We’ll be investigating the performance penalties associated with the MTH in an upcoming article, but for now, just keep in mind that running SDRAM on an i820 motherboard will result in a significant performance hit and you will notice slower overall performance than if you were running the same setup on a BX motherboard.
There are two possibilities for designing an i820 motherboard with SDRAM support. One is to eliminate all RIMM slots and provide a DIMMs only solution; and the other is to use a combination of RIMMs and DIMMs. Keep in mind that even if you have a motherboard that uses RIMMs and DIMMs you can only use one memory type at a time, and if you’re using the DIMM slots then the remaining RIMM slots must be occupied by continuity modules commonly known as CRIMMs.
The idea behind an i820 with support for both memory types is that the user can use affordable SDRAM now, and then later on, when (if) RDRAM drops in price you can make the switch to RDRAM and enjoy faster performance.
One thing to keep in mind is that a single MTH module can provide up to 4 RAS lines, meaning a total of 2 double sided DIMMs can be used or a maximum of 4 single sided DIMMs can be use per MTH. Just because you see a board with 4 DIMM slots doesn’t mean that you can use all 4; it’s the number of MTHs you have on-board that determines how many DIMMs you can install. We have seen manufacturers take advantage of two MTHs in their designs in order to support more SDRAM banks.
Dual Processor Support
While this roundup was originally intended to be a roundup of single processor i820 motherboards, we received one dual processor entry that forced us to change the scope of the article slightly. We will eventually perform a roundup of dual processor i820 motherboards as more manufacturers begin shipping their motherboards.
In the discussion about the i820’s MCH, we mentioned that there are two versions of the MCH, the 82820 and the 82820DP, the latter offering support for dual processors. However, since the two chips are pin-compatible, it doesn’t take much work for a manufacturer to implement one or the other in their designs.
The 82820DP differs from the regular MCH in that it features the logic required for dual processor operation integrated into the chip itself.
If you recall, with the BX and GX chipsets, this logic was present in the form of an external ASIC that slightly increased the cost of motherboards that featured it. By integrating the logic into the chipset, not only do you save valuable PCB space but you also decrease the cost.
Don’t think that this step is a unique one, because according to VIA, their Apollo Pro line of chipsets has had the logic integrated into the North Bridge for quite some time. It’s just that until recently, no manufacturer had ever thought of producing a dual processor VIA motherboard. However, at last year’s Comdex, Tyan gave us a nice demonstration of their upcoming dual processor solution running on a VIA chipset, with no external ASIC.
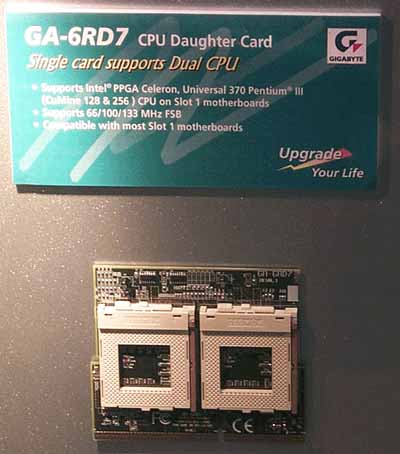
This brings up an interesting question - if, by using the 82820DP MCH, you don’t have to add any external ASICs in order to enable multiprocessor operation, shouldn’t you theoretically be able to install a dual Socket-370 card in a single slot-1 motherboard that uses the 82820DP MCH and be able to have a cost effective dual processor system?
While we have yet to be able to answer this question, at last year’s Fall Comdex we did manage to see a solution from Gigabyte that could be just the solution we’re looking for.
QDI announced a similar solution a little while back, but their implementation required a specific model of motherboard that happened to have the ASIC on-board, despite being a single Slot-1 board.
Hardware Monitoring Support
Hardware monitoring is one of those often overlooked features of a motherboard. While it's not a necessary component, it can help prevent catastrophic failures or provide valuable information when troubleshooting a problem. For example, you can set an alarm to go off if the system is overheating or a fan has stopped. Some software will even shutdown the system automatically under such circumstances. Many motherboards even throttle back the CPU speed if things start to heat up too much. All this in the name of protecting your system and your data.
Most hardware monitoring chips out there allow for the measurement of system voltages, CPU fan speed, system temperature, and CPU temperature. However, each chip out there has different features when you get into the nitty gritty. Complicating things further is the fact that it is up to each individual motherboard manufacturer to implement those features and every implementation ends up being slightly different. Let's take a look at the different hardware monitoring solutions out there, along with some of the possible implementation issues they may face.
Winbond 83781D
The Winbond 83781D was the first popular hardware monitoring chip on the market. It's actually still used by a few companies that haven't bothered to upgrade to the newer editions of this chip. The 83781D provides monitoring for 5 positive voltages, 2 negative voltages, 3 remote temperatures, and 3 fan speeds. A case open input is also available for added security.
Those 7 voltage inputs are typically used to monitor +/-5V, +/-12V, +3.3V, and Vcore. The remaining voltage input is often used to measure VTT, +5Vsb (standby), Vbat (battery), or the Vcore of a second CPU. The 83781D features five Voltage ID (VID) inputs that read the VID pins of the CPU in order to compensate automatically for different Vcore values from different processors.
The three remote temperatures are read via external thermistors. A thermistor is a device whose resistance varies proportionally to its temperature. These thermistors can be mounted anywhere on the motherboard, but typically at least one is used to monitor the CPU temperature. A CPU thermistor would be mounted either in front of the CPU slot or inside the CPU socket. Some motherboards offer headers that allow you to hook up your own thermistor anywhere in the case. The reaction time and accuracy of the thermistor varies by brand and model.
Winbond 83782D
The 83782D is the successor to the 83781D and offers one key advantage - the ability to read CPU temperature from the on-die thermal diode of any 0.25 micron or 0.18 micron Intel CPU. Reading from the on-die thermal diode offers the most accurate CPU temperature possible.
Otherwise, the 83782D offers similar specs - monitoring for 9 voltages, 3 temperatures, and 3 fan speeds. Case intrusion is still supported as is the CPU VID detection of the correct Vcore. Those 2 additional voltages allow for monitoring of just about every voltage in the system, usually +/-5V, +/-12V, +3.3V, Vcore, VTT, +5Vsb, and Vbat.
Most motherboard manufacturers that choose the 83782D are wise enough to read the CPU temperature from the on-die thermal diode. However, a surprising number still use this in conjunction with an external thermistor near the CPU slot/socket, which leads to slower reaction time for temperature changes.
Winbond 83783S
The Winbond 83783S is simply a stripped down version of the popular 83782D chip and differs primarily in the number of voltages monitored - 6 instead of 9. Typically, this is used to monitor +/-5V, +/-12V, +3.3V, and Vcore. You can still read CPU temperature from the on-die thermal diode, but, once again, many manufacturers are still using thermistors. Case intrusion is still supported as is the CPU VID detection of the correct Vcore. Motherboard manufacturers choose this chip over the other Winbond models to cut costs just a bit.
Winbond 83627HF
The 83627HF is actually primarily an I/O controller that happens to feature hardware monitoring support. On the hardware monitoring side, it's very similar to the W83782D. It offers the same total of 9 voltage inputs, 3 fan speeds, and 3 thermal inputs. Once again, CPU temperature can be read from the on-die thermal diode, the VID detection of Vcore, and case intrusion are all supported. Since this chip is quite new, most implementations make use of the CPU's on-die thermal diode, but continue to watch out for thermistors for monitoring CPU temperature. The 83627HF does add one interesting feature - the ability to control fan speed as system/CPU temperature varies. Expect this chip to become extremely popular because its price premium over a standard I/O chip without hardware monitoring is minimal.
Winbond 83697HF
Like the 83627HF, the 83697HF is also primarily an I/O controller with integrated hardware monitoring features. It's a stripped version of the 83627HF with the main differences being a total of 8 voltages monitored, 2 thermal inputs, and 2 fan speeds. Once again, CPU temperature can be read from the on-die thermal diode, the VID detection of Vcore, case intrusion, and fan speed control are all supported. Since this chip is quite new, most implementations make use of the CPU's on-die thermal diode, but continue to watch out for thermistors for monitoring CPU temperature. We also expect this chip to become quite popular as it is even cheaper than the 83627HF.
Jumperless CPU & Voltage Configuration
Ever since ABIT and QDI produced the first ever motherboards with a fully jumperless CPU and voltage setup, the goal of many manufacturers has been to bring that level of ease of use and operation down to their products as well.
The AWARD BIOS Setup v6.00 features a built in CPU Frequency & Voltage adjustment setup; it is the job of the manufacturer to take advantage of the option and enable it on their motherboards. There is no excuse for an i820 motherboard that uses the AWARD v6.00 BIOS to not have a jumperless CPU & voltage configuration.
There are certain features which you should be able to adjust, and those features do take a little more work on the part of the manufacturer to implement, especially in a jumperless configuration.
Features such as voltage supplied to the MCH and MTH (if applicable) can always be of use when overclocking, and control over the RDRAM clock multiplier (RDRAM operates at a multiple of the FSB frequency) is a feature that would be quite useful to have.
The number of FSB frequencies supported is a function of the particular clock generator on the motherboard, but being able to support the entire range of FSB frequencies is something that must be implemented within the BIOS setup if the board boasts a jumperless configuration.
BIOS Setup & Support
Another often overlooked feature is a motherboard’s BIOS setup utility. All of the i820 motherboards use a BIOS – contained within the i820’s Firmware Hub (FWH) – manufactured by either AMI or AWARD.
Our preference in the lab is towards the AWARD 6.00 setup utility, but the most important consideration is how thorough the setup utility covers the features and options of the chipset. Arguably of equal worth to any motherboard is how well the manufacturer keeps the BIOS up to date and takes care of problems as they become aware.
The only way to truly measure this is by visiting the manufacturer’s support section and take a look at BIOS updates for other motherboards as well as ask around online message board forums and newsgroups.
Manufacturer Support
One of the most important features when dealing with any motherboard is the support that backs it. Support is available not only in the form of written documentation but through the manufacturers’ web site in the form of driver downloads, BIOS updates, and more. It’s always good practice to check around motherboard manufacturers’ web sites in order to see the frequency at which they update their BIOSes (especially for older motherboards).
There is no replacement for word of mouth passed on by other users, and it seems like motherboards don’t inspire the same tension that video cards and CPUs do when it comes to asking for advice. Whereas asking the question "3dfx or NVIDIA?" or "AMD or Intel" in most newsgroups will end up in a flame war, asking for personal experiences with a particular motherboard manufacturer on-line will usually give you a good set of responses to help gauge your motherboard manufacturer’s support rating. The AnandTech Motherboard Discussion Forum on the AnandTech Forums is an excellent place to ask about individual experiences with motherboard manufacturers.
The Candidates
Over the next few weeks you will see individual reviews of all of the motherboards covered in this roundup, and, as we publish them, we will add the links to the reviews in this section However, until then, here are brief looks at all of the motherboards present in this roundup.
AOpen AX6C & AX6C-L

AOpen has always produced very solid motherboards and they continue their strong tradition with the two entries supplied for this roundup. The AX6C was AOpen’s original i820 solution and it was one of the first i820 based motherboards to ever come into the lab. Unfortunately, because of the layout issue with 3 RIMMs, AOpen was forced to re-design the AX6C and outfit it with only 2 DIMMs.
Though, instead of scrapping the AX6C, AOpen decided to leave it as is and produce another motherboard, the AX6C-L, with only 2 RIMM slots. AOpen’s internal testing proved that the presence of the 3rd RIMM slot on the AX6C didn’t adversely affect its stability and thus they saw no reason to deprive their customers of the third RIMM slot if they desired one.
Our tests tended to agree with AOpen; the addition of the 3rd RIMM slot didn’t seem to change the stability of the AX6C at all from the AX6C-L. However, for those of you that still don’t feel safe with that third RIMM slot there, AOpen offers the AX6C-L which is the exact same board, minus the third RIMM slot.

AOpen has made their i820 boards very appetizing to the hardware enthusiast population as they offer the most flexibility out of all of the boards in this roundup. This flexibility comes in the form of the jumperless frequency and voltage control options present within the boards’ AWARD BIOS Setup utility (v6.00).
Not only does AOpen offer a decent selection of FSB settings, they also allow for the RDRAM clock multiplier to be set independently of the FSB setting. This allows you to increase your FSB setting without worrying about your RDRAM being overclocked to speeds it cannot handle. The AOpen boards are the only ones capable of doing this but now that the secret is out, don’t be surprised if others follow in their footsteps.
The AX6C and AX6C-L both provided the stability and reliability we’re used to from AOpen which gave these boards some of the highest stability ratings in this roundup.
ASUS P3C-2000
ASUS is another name in the motherboard industry that we often associate with quality and reliability. Their entry into this comparison was a unique one since it featured no RIMM slots; instead, courtesy of the on-board Memory Translator Hub, it featured 4 DIMM slots.

This makes the P3C-2000 one of the more affordable solutions in the roundup, not as a motherboard, since the ASUS name does carry an associated price premium, but as a system solution since PC100 SDRAM is much cheaper than 800MHz RDRAM.
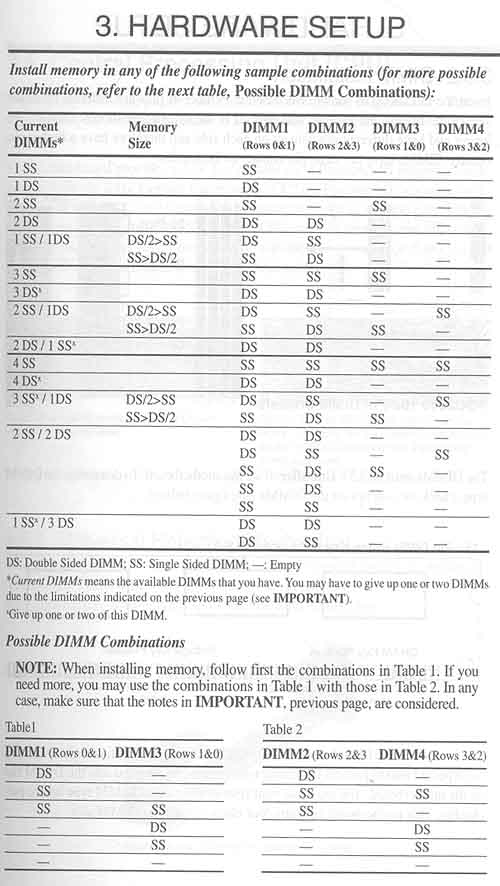
The fact that there are 4 DIMM slots on the P3C-2000 should raise some eyebrows because, after all, we mentioned earlier that a single MTH only provides 4 RAS lines. This means that you can either install 2 double sided DIMMs or 4 single sided DIMMs, and since the ASUS P3C-2000 only features a single MTH, that means that there are some stipulations that go along with installing DIMMs in these memory banks.
One of the most interesting requirements is that, if more than one DIMM slot is populated, then the first DIMM slot must have the largest sized DIMM installed in it.
Here is a list of the possible memory configurations taken from the P3C-2000’s manual:
ASUS has always been known as an enthusiast’s board. While they may not receive the praise that companies like ABIT do for putting hundreds of FSB settings on their motherboards, from the roots, ASUS has been an overclocker’s board. Remember back to the days of the HX chipset when the ASUS T2P4 was the first motherboard to ever boast an 83MHz FSB setting, which was something that previously hadn’t been seen on a motherboard.
Following in that tradition, the P3C-2000 features the option of increasing the I/O voltage (the voltage supplied to the DRAM, chipset, AGP and PCI buses) but, even more importantly, the voltages supplied to the MCH and MTH. The P3C-2000 also allows you to set the SDRAM clock to be either equal to the FSB frequency or at 3/4 of the FSB frequency. This let's you run your memory clock at 100MHz while your FSB is running at 133MHz or at a full 133MHz if you have memory that can handle the increased speed.
From an overclocking standpoint, the P3C-2000 supports the largest range of FSB frequencies out of the bunch, supporting frequencies up to 180MHz.
Continuing the trend of uniqueness with the P3C-2000 are the optional ISA slots that ASUS offers with the motherboard. While our particular sample featured an ISA bridge and a single shared ISA slot (and 5 PCI slots), ASUS also offers a configuration option with 2 ISA slots and 4 PCI slots as well as an option to remove all ISA slots and have just a 5 PCI slot configuration.
The P3C-2000 was also one of two motherboards in this roundup that feature an AGP Pro connector, which is a very interesting fact since the board is a single CPU motherboard and you would expect only the high end motherboards to feature an AGP Pro connector.
The stability of the P3C-2000 was up there with the AOpen boards, and it also got our recommendation for a stable i820 motherboard.
Gigabyte GA-6CX
The GA-6CX is another model we’ve had for quite some time; however, the updated shipping revision of the motherboard (1.0) features one less RIMM slot from the board outfitted with 3 RIMMs that we first tested.

Gigabyte also made it a point to replace the poor quality set of dip switches on the early revision boards with a more reliable block that won’t break and wear out as easily as the previous ones.
The board itself is fairly standard: it features 5 PCI slots and an the choice of adding a single ISA slot which would be shared with the 5th ISA slot as an OEM option.
The most unique feature of the GA-6CX is Gigabyte’s patented Dual BIOS setup that provides a backup BIOS on-board in the event that the main BIOS is corrupted or is improperly flashed. While most AnandTech readers haven’t had too many bad flashes in the past, this is a feature very well appreciated by OEMs that get a lot of “my flash went bad” support calls.
A few complaints that we had with the GA-6CX included the fact that Gigabyte continues to refuse to read from the thermal diode on the CPU and insists on using an external thermistor to read the CPU temperature which isn’t nearly as reliable as the thermal diode.
Secondly, the GA-6CX still isn’t fully jumperless as the FSB frequency is adjusted by the 4 dip switches present on the motherboard, although the clock multiplier can be adjusted in the BIOS. This frankly makes no sense because the clock multiplier on all Intel CPUs is locked, whereas the FSB frequency is what most overclockers need to adjust.
Finally, while the 6CX features FSB settings up to 150MHz, the lack of control over the RDRAM clock multiplier renders that FSB setting virtually useless unless your RDRAM is of an unusually high yield.
The stability of the GA-6CX was quite impressive, as we’re used to from Gigabyte, and was pretty much on par with AOpen and ASUS.
Iwill DS133R
As we mentioned before, the Iwill DS133R is the only dual processor i820 board that made it into the roundup. The board is nothing too special, it features 5 PCI slots with an OEM option of 1 shared ISA slot.
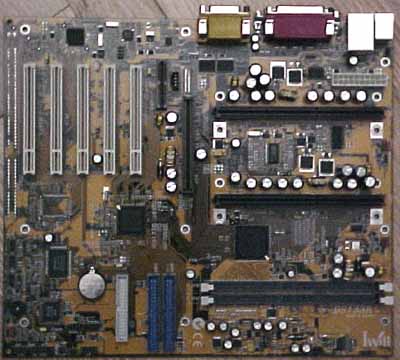
The board features no on-board SCSI but Iwill does have other dual processor i820 boards that do offer that option. The only unique quality of this motherboard is that it features integrated Intel 10/100Mbit Ethernet through the use of the 82559 chip present just above the 3rd PCI slot.
The integrated Ethernet is a very useful option, especially for a workstation/server board like the DS133R and is cheaper than going out and purchasing an Intel 10/100 adapter, plus it doesn’t take up a PCI slot.
An interesting absence from the DS133R is the AGP Pro slot, especially since this is a workstation board, but it seems like Iwill didn’t see any need to include it. Whether they were right in that assumption or not has yet to be determined, it’s just an interesting point to make.
The stability of the DS133R wasn’t anything to complain about; while it wasn’t as solid as the previous four boards, it came quite close.
Supermicro PIIISCA
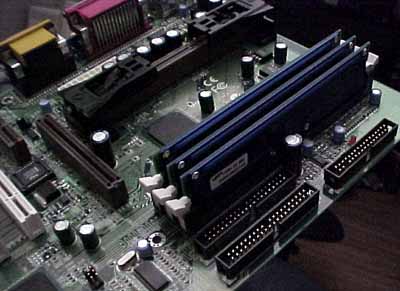
By far the most interesting motherboard out of the seven that we looked at in this roundup, the Supermicro PIIISCA features one of the hybrid 2+2 memory configurations that we mentioned earlier. Not only does the board feature 2 RIMM slots but also an additional 2 DIMM slots and an MTH to provide for their operation.

The board features 5 PCI slots, an AMR slot and an AGP Pro slot. There is no ISA OEM option for the PIIISCA however the 370SCD, a FC-PGA 370 (Socket-370) version of the PIIISCA does feature one ISA slot. Once again, it is very interesting to note that a desktop consumer level motherboard features an AGP Pro connector, whereas the only workstation level board in this roundup did not.
From a stability standpoint, the PIIISCA was by far the poorest in this bunch. When using RDRAM, the test system would crash randomly to the point that the system was rendered unusable for any normal purposes. The problems were somewhat alleviated by using the fail-safe defaults in the BIOS but the system was still very unstable.
Switching to SDRAM seemed to fix the issues but, even when using SDRAM, the PIIISCA wasn’t nearly as stable as the ASUS P3C-2000. We are not sure if the issues were related to our sample or the board design itself, and the only recommendation we can give as of now is to be weary of motherboards that boast both SDRAM and RDRAM support.
Transcend TS-ACA1
Transcend is a motherboard manufacturer that we just recently discovered, and they do produce some fairly high quality products. With the exception of their Apollo Pro 133 board, we haven’t had many problems with the Transcend motherboards that we’ve tested.

The TS-ACA1 isn’t too different. It’s a plain vanilla i820 board: it features 5 PCI slots, an AMR slot and a regular AGP 4X slot. There is no option for an ISA add-on and the board features the same 2 RIMM slots that most i820 boards will boast.
The stability of the board was about average for an i820; while it wasn’t as reliable as the two A’s (AOpen and ASUS) it was decent. If the price is right, the TS-ACA1 may just offer a good value, but if you’re willing to foot the cost of RDRAM, then you shouldn’t mind spending an additional $30 - $40 on an AOpen or an ASUS.
The TS-ACA1 wasn’t the best overclocker either. Our FC-PGA 550E at 733MHz crashed more on the TS-ACA1 than on any of the other boards, with the exception of the Supermicro PIIISCA.
The Test
Click Here to learn about AnandTech's Motherboard Testing Methodology.
|
Test Configuration |
|
| Processor(s): |
Intel Pentium III 733EB OEM
Provided by Memman |
| RAM: |
1
x 128MB Samsung PC800 RDRAM
Provided by Mushkin |
| Hard Drive(s): |
Western Digital Expert
418000 - UltraATA/66
|
| Bus Master Drivers: |
Microsoft
Win98 DMA Drivers
|
| Video Card(s): |
NVIDIA
GeForce 256
|
| Video Drivers: |
NVIDIA Detonator 3.68
|
| Operation System(s): |
Windows
98 SE
|
Performance
The main purpose for providing performance benchmarks was to illustrate the similarity in performance of all of these solutions. The only exceptions being the boards that made use of a MTH in order to support SDRAM, where performance was noticeably lower than the rest of the group.

Conclusion
If you’re in the market for an i820 motherboard, AOpen is the way to go. The AX6C and AX6C-L are both very stable and very reliable contenders for the best i820 motherboard, and just as the AX6B was to the BX motherboard market, expect these motherboards to remain on top in terms of reliability and stability in the long run.
The ability to manually select the RDRAM clock multiplier is a very useful feature, especially when overclocking, and it was a very good idea for AOpen to include that feature within the BIOS setup of both boards.
 Therefore,
our pick for Editor’s Choice for the best i820 motherboard with RDRAM support
out of this group goes to AOpen for the AX6C and AX6C-L.
Therefore,
our pick for Editor’s Choice for the best i820 motherboard with RDRAM support
out of this group goes to AOpen for the AX6C and AX6C-L.
The first runner up goes to ASUS for the P3C-2000, whose stability and feature set is just about on-par with that of AOpen, the only major downside being that with its SDRAM support comes sub-BX levels of performance. If you’re willing to make that sacrifice in order to have an i820 based motherboard, then the P3C-2000 is a very good option.
The flexible overclocking options of the P3C-2000 as well as SDRAM support make it a very appetizing option; if it weren’t for the performance hit associated with the MTH, it would be the perfect motherboard with 133MHz FSB support.
We will be regularly updating our i820 motherboard roundup as we receive more motherboards based on the chipset, and expect to see roundups of Apollo Pro 133A, KX133/AMD750, and dual processor motherboards in the near future.


